Feeds:
Posts
Comments

Archive for March, 2009


Through the grapevine I heard that an old Massey Ferguson tractor might be for sale. Always interested, at a friend’s workshop I ended up being passed the phone and talking to someone who knew about the tractor. Slowly it became clear that I actually knew the farm and the tractor that might be for sale. So now there is a new friend in the family.


Meet Peter, my little red Massey Ferguson. He’s a 1974 MF135 with under 6000 hours on the clock and one very careful owner. In fact he’s spotless and it will be a challenge for me to keep him in the same condition.

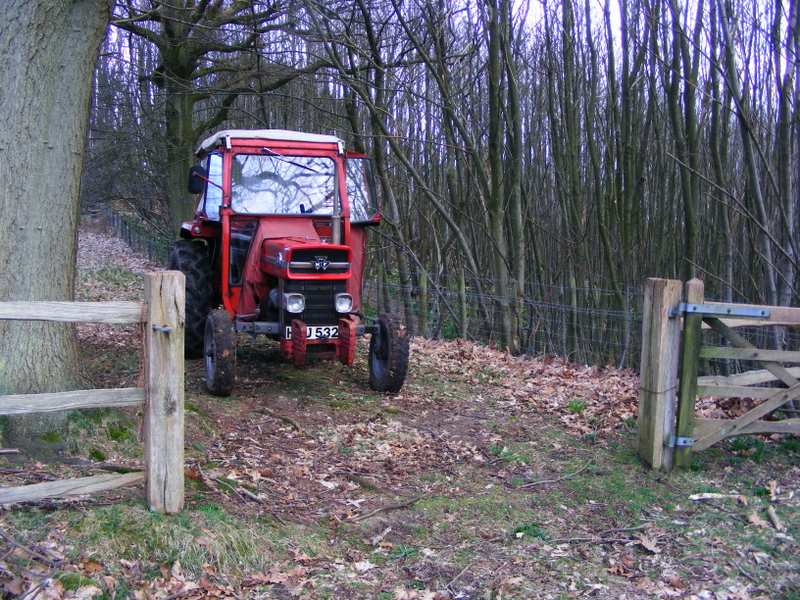
So this afternoon the deal was done, although it felt more like an interview. But it seems that I passed the test and I was allowed to take him away with me After much discussion of the niceties of the model and an introduction to the controls (which I needed as I’ve mainly been driving monster modern tractors with air con and surround sound recently) I drove Peter triumphantly back through 4 fields from his old home to his new home. We don’t get out much around here.


So Peter will continue to be seen working on the same fields, and now on the commons as well. After all he’s been working around here much longer than I have so it feels good to be entrusted with him and I’m looking forward to working with him.

Don’t forget to wave if you see me passing by!

Read Full Post »

A friend recently asked me to rehandle an old garden tool. I’m not sure what you’d call it, a scratcher seems appropriate. It’s somewhere in between a fork and a rake, ideal for going over vegetable patches and breaking up the large clods of earth left by digging.

It’s the kind of tool that you don’t see in the garden centres these days.

I find there is something enormously satisfying about taking an old tool and refurbishing so that it has a new lease of life.

Sometimes getting the old handle out can be the biggest problem, and I have had to resort to leaving them in a fire to burn out the handle. But in this case the wood was so rotten and worm eaten that it came out easily once I’d cut through the rivets with a jigsaw.

The new handle is an ash pole thats already a couple of years old (in fact its part of a standby polelathe pole) so quite dry but should do well for many years as a handle.

Fitting the handle is a straight forward job using a draw-knife on the shave-horse. Each trial fit the handle leaves a mark on the high points which can then be shaved until the fit is snug.

The trick with these tools is to fashion the new rivets.

A friend who used to work as a coppicer taught me how to do this by peening (cold hammering) over the ends of six inch nails. First drill the hole and then drive in the nail. Cut it to size but leave it standing proud by about 1/8 inch or so.

The metal is soft enough to hammer around the edges until it forms a domed rivet head. A single six inch nail is enough for 3 or 4 rivets. One of those things where a good job looks right.

A quick scrub with a wire brush and a liberal coating of boiled linseed oil, cut with turps substitute to help it penetrate the wood of the handle. I use boiled linseed oil as it dries and hardens relatively quickly to a protective coat on both the wood and the metal.

Of course you can add some bees wax to the mix – and you’d then have the original wax-oil, still used by blacksmiths to put a protective coat on their metalwork.

Read Full Post »

Sunday was good weather and my first outdoor show of this year at the Weald & Downland Open Air Museum, Singleton, near Chichester where I am the bodger (aka pole lathe demonstrator).

The medieval farmhouse, Bayleaf, is one of the jewels in the crown at the museum and gets to feature in a lot of films and TV shows.

I was on my normal pitch, an old oak tree down beyond the water mill next to the blacksmiths forge. A hole in the canopy, enlarged over the last couple of years, just allows me to shelter under it. You will find me there at most of the shows this season.

With the calm weather and only a 1 day show I decided to go ‘au natural’ without my pole and canvas shelter which takes extra time to put up and take down.

Before the museum opened I had a quick walk around to say hello to some of the buildings, the animals and friends I haven’t seen since last year.

Behind Bayleaf, the farmhouse is a large barn and the oxen, who didn’t seem particularly impressed to see me early in the morning.

One of the things I like about the museum is the way in which the buildings and animals are all working together.

It’s a place where you can kick the tyres – but wear boots if you do, because most of the tyres are metalled!

The side of Poplar, a small workers cottage from the 17th century was bathed in the warm light from the sun with the winter teasels still standing in the garden.

It just kept getting warmer through the day which was a great contrast to last years cold and wet shows. Almost too warm as there was little shelter from the sun without the tree in leaf.

The weather brought out the visitors in good numbers, over 3 thousand. Certainly kept me busy all day and the first task was to make a new display table as the old one had just collapsed!

By the time the last of the visitors had gone it was well past 5 O’clock and the museum had closed at 4pm!

Many thanks to Robert and Carol, the blacksmith’s, for keeping in cake and helping me dismantle the recalcitrant lathe at the end of the day when I lost the plot. A great day with everyone in good spirit and I’m looking forward to the next show over Easter.

Read Full Post »

I brought the first full demi-john of birch sap back a couple of days ago, but with volunteers groups and then demonstrating at the Weald & Downland museum over the weekend I haven’t had to time to spare for the wine making. By the time I looked at it tonight it had already started to ferment a little with the natural yeasts.

There are several recipes for making birch sap wine that I have found, mainly in old country wine books. They are all slightly different. Some boil the sap and some don’t. Some add differing amounts of sugar, and some don’t add any sugar at all.

Nearly all add the juice of a lemon and a few add grape concentrate or a few ounces of raisins. The lemon adds acid and the grape/raisins the tannin and nutrients which allow the yeast to thrive. I’ve tried most of these with differing levels of success and in the end I use a very simple recipe.

I boil the sap with a sliced lemon and add around 2lbs of sugar. Allow it to cool, pour back into a demi-john then pitch in the yeast (I used general purpose wine yeast) which I start separately using some of the sap, hot water and a tablespoon of sugar. and then fit an air-lock to the demi-john.

Then leave to ferment for a few months depending upon the temperature. The warmer it is the quicker it will ferment. Once it’s completed fermenting, place it somewhere cooler and leave until next spring when it should be ready to drink.

As I don’t add raisins or grape concentrate the fermentation can be a little slow sometimes. It’s a good idea to use a wine hydrometer to show you the specific gravity at each stage and to judge when its finished fermenting. If you add more sugar at the start (or as it goes along), the wine won’t necessarily be stronger, but the yeast will die once the wine reaches a certain strength, the remaining sugar will result in a medium wine rather than a dry wine. Althernatively you can use a high alcohol yeast to create rocket fuel instead.

Once it’s ready the wine should clear (eventually) and it can then be bottled. Here is one from last year that’s almost ready to bottle and some already bottled.

Cheers !

Read Full Post »

I used to use string for my peas in the vegetable patch, but a couple of years ago I tried some birch spray for pea-sticks and was hooked. They work much better and if you use them for flowers like sweet peas they look really good.

A good pea-stick is a flat fan-shaped top from Hazel, birch or any other suitable young coppice tree.

They are typically about 4ft 6in high. Cut off any shoots that are lying in the wrong direction and then clean the bottom 12 inches of shoots with the bill hook and put a slanted cut on the end so they push easily into the ground.

In practice they don’t have to be fan-shaped or flat and just about any top will do the trick particularly if you are planting in rows or if using them bent flat on flower beds. Old ones can be used to keep cats off fresh beds and eventually as kindling.

Bundled into 10 or 20 they are tied loosely at the base.

They can then be weighted on the ground with logs to help them form the flat shape until used.

I put a few bundles together today for this weekend as I am demonstrating pole-lathe at the Weald and Downland museum on Sunday. First show of the season and time to shake off the cobwebs.

Unfortunately as I found out today, pea-sticks don’t photograph very easily, especially on a woodland background.

But the weather has been great here this week and I was surrounded by brimstone butterflies whilst bundling up the sticks. Suddently a pair of buzzards appeared right over me quite low and then circled catching a thermal and rising until they almost disappeared above me.

Read Full Post »

I have a feeling that bean poles will be popular this season. Now that Spring is the air, and while the weather is good I can see people are getting out in their gardens. With all the bad news in the media perhaps the vegetable patch will get more attention this year, and maybe a lot more people will start to enjoy growing their own.

If so, I aim to help and with National Beanpole Week at the end of April (25th to the 3rd May) I’ve decided to get into the spirit by increasing the number of beanpoles that I bundle up this year.

I bundle the rods in 11’s and cut them to 6ft 6in or 7 ft using the straightest rods I can find, though it matters little if they are a bit kinky.

I’ve already sold a couple of bundles this season and here are some already in place.

I am using birch for the poles, mainly because I have more birch and its straighter than the hazel at the moment. Hazel is more generally used. But I imagine that poles of sweet chestnut, ash and willow would also have been popular as they all coppice well and much would have depended upon the type of coppice woods in the area.

The concern always raised with birch is that it has a reputation for rotting swiftly. Herbert Edlin writes about Birch in his book ‘Woodland Crafts in Britain’ and says of birch poles ‘frequently used for rustic work in gardens, with the bark left on to retain their attractive appearance; they endure reasonably well if seasoned before use and barked and creosoted where the butt is inserted into the ground’.

I have not had to bark, let alone creosote the butts and I have found that birch and hazel last for a similar length of seasons, and make fine kindling once a fresh batch is obtained.

To make the poles I first strip all the branches from the stems and cut off the tops using a bill-hook. When doing this I am looking for good besom or pea-stick material in the tops which are then piled to be sorted through once the poles are finished.

Then I sort through the pile of poles looking for the 7ft straight lengths of about 1 inch at the butt end, which I cut to length using a pole as a measure. All the 7ft cut poles are then piled to be sorted. Before tying into bundles of 11 I use the hook to thread all the knots and spikes by running it along the pole.

The offcuts and poles too kinky for beans are not discarded as they may still be of use for tomato or flower stakes. Traditionally these are about 4dt 6in in length and about 1inch at the but. Those too stout may become rustic poles instead. But if all else fails the rest will be turned into charcoal or kindling so everything will be used.

I’ve finished cutting the birch and almost finished working up the bean poles now. Next will be pea-sticks, as I have my first show to go to this weekend and I want to take a few bundles of poles, stakes and pea-sticks to promote national beanpole week.

Read Full Post »

How does the rhyme go…. Scrub a dub dub, two men with a shrub?

Sunday was a gloroious day for getting outside and finishing off some of the winter work. We’re at the end of winter work season now. The last of the work needs to be sensitive to wildife in the spring, particularly the rare ground nesting birds that are easily disturbed. We worked on an area of the Lynchmere commons that is entirely managed by volunteer effort (if I count the grazing shetland cows as volunteers as well).

Over the last few years the volunteers have slowly expanded the area of restored heathland clearing scrub as we go.

We had a good turn out with over 20 people joining in through the day and we mainly cleared silver birch and common gorse, where it’s growth is starting to affect the regeneration of the heather underneath.

We completed a corridor between two areas already cleared and we found a lot of the much more rare dwarf gorse mixed with the common gorse. In future we should have a good selection of heathland plants in this area. Not to mention a good view as well.

Not all of the scrub is burned. Some is left to provide a habitat and fringe to the woodland areas. I prefer to waste as little of the cut scrub as possible although the volunteers are renowned for having big fires. But each year we are finding a way to use more.

Here is a load I prepared earlier.

Some goes to the deadhedging around our newly planted hazel coppice and I use some for bean poles or pea-sticks and store bales of birch spray to make besom brooms with later in the year. This load should produce all of these as I work it up in the next couple of weeks.

Read Full Post »

I prefer to use a pole rather than a bungee cord when I use the lathe. Not just because it’s traditional but because I find that a 16ft pole delivers a more constant force over the whole of the 3 or 4 ft of travel that I use when turning.

In the shed I was using a bungee cord because a pole got in the way. But when I recently broke the bungee cord I decided to experiment with a pole mounted along the rafters to keep it out of the way.

It’s not quite as simple as strapping it to the roof as the pole needs to be free to flex. In my first attempt I used a wooden block to clamp it in the middle and a piece of rope to tension the end that protrudes from the front of the shed. But I reverted to lashing the pole as it allows the right amount of flexing along the pole. It’s just right now and the pole dances lightly along the roof. I dance a little less lightly on the floor below.

Read Full Post »

The sap was rising strongly yesterday, and pouring from a cut birch stump. It will do this for a couple of weeks. At this time of year the tree is preparing for its return to growth so it’s turning stored energy into sugars and transporting them to where they are needed in the branches.

Birch sap is quite strong in sugar, like sugar maple but only a tenth or less of the strength. Not so good for syrup (although it has been boiled down for this) but it is traditionally gathered for use in making birch sap wine.

So now it’s time to tap into the trees and gather some birch sap. I use a short lenght of plastic tube, a brace and bit and a demi-john.

The drill needs only to go though the bark and into the first layer of sapwood, just enough to plug in the hose. If the sap is running in the tree it will appear very quickly and start to drip rapidly from the tube.

Leave overnight and collect the sap in the morning, when its running strongly you can gather a gallon overnight.

Taking only a gallon (or maybe two from a very large tree) will not harm the tree and after use the hole needs to be plugged to prevent infections from entering the tree.

Read Full Post »

Apparently Yesterday was ‘Worship of Tools’ Day. I don’t know where the idea came from or why it would be on the 11th March but it sounds a fine idea to me.

I was out on the commons yesterday so to get in the spirit of things I gave some of the tools a little fettle today to make up for the ravages of the winter.

I started with some of the greenwood tools that hang on one of the walls. Though most of these tools are not actually in use at the moment as I was out working up beanpoles and peasticks yesterday so most of my favourites were in the greenwood tool box.

Then onto the saw cupboard, which at the last count has 6 chainsaws and half a dozen cross-cut and ripping saws in residence. No, there is no point in asking why? If you need to ask…….

Shame that they have to be hidden away rather than on display but it’s not worth taking chances and the location of the cupboard will remain a tightly guarded secret – a secret tool chapel.

As Treewright said yesterday on the bodgers forum – ‘He who dies with the most tools wins!’ And yes Robin, you might recognise one of the cross cut saws.

Finally time to worship at the lathe, with the chisels.

Well if this is worshipping tools (which might not be far from the truth in my case) then I suppose that makes the Shed a Church. Perhaps its time that my shed gained a little more respect!

Read Full Post »

Older Posts »

Omubazi Mike

Green woodworking enthusiast that loves to create and to pass on his skills and knowledge.

Woodlandantics Blog

Greenwood Working & Woodland Crafts

The Scythe Grinder's Arms

for all your Scythe Grinding and more - come on in and join the discussion

Wympole & Wratsworth

Everything you need to know about the countryside at Wimpole

Lynchmerecommons

At work and play on the Lynchmere Commons

Morgans wood's Blog

Traditional crafts and coppicing

Mike Abbott's Living Wood

Green Wood Chair-making

Steve Tomlin Crafts

Handmade wood craft for the home & Learn to Scythe

Old Kiln Forge

Artist Blacksmiths